Monday, April 30, 2018

Forward Fold 3 ways

"L - Shape" at the Wall, "Uttanasana", & "Supported forward fold" to utilize props in a restorative way are all great ways to experience the benefits and calming effects and endless variations of forward folds on your body.
All three postures can be modified for beginner students and advanced as well to benefit all people.


Lets start with "L- Shape" at the wall; first come to face the wall. If you need to sit with your back on the wall and where your ankle bone is please use a black to mark the distance for your legs from the wall, this is unique to your body, please respect this measurement. Move the block away bring your heels to where the block was. From here with feet comfortably below the hips, hinge at the hips and bring your palms flat to the wall keeping the elbows straight, the shoulders in the socket and the crown of the head reaching forward. This may seem like a lot of instruction but as long as it feels good, and that the hamstrings are opening the back and spine lengthening, you good!


Inverting L-Shape, step by step.
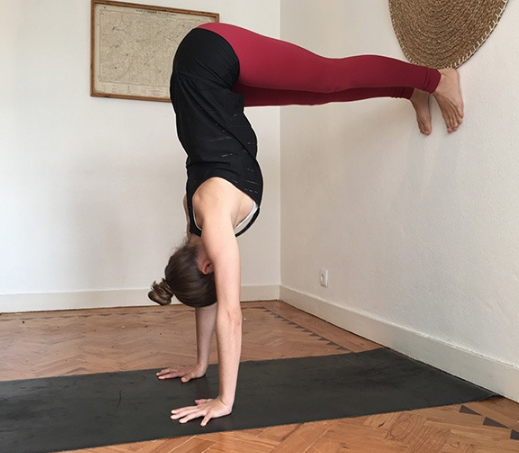
Inverting L-Shape
Variation of inverted L-Shape, with forearm stand arm


The L-Shape is good for SO many things and is a supported inversion using the wall. 

You may want to start with Uttanasana, a deep forward fold, but can be experienced many ways depending on your body IN THE PRESENT.
Modifying Uttansana is a matter of preference, I suggest trying each modification and working in a range of movements to experience the full potential of your body in the posture.

Modified version of Uttanasana in chair.

For example, sit in a chair, and come to the edge of the seat, with your legs wide inhale lengthen the spine, exhale come forward let your head and torso come as far as it can to the floor, a block another chair and rest for a few breath cycles.

Modified Uttanasana, forward folding using the chair as a support.

Uttanasana, modified without supports, but with a wide stance to allow for a wider base of support.

From a seated position you can also try forward folding with supports. While each posture compliments each other and have similar benefits and contradictions ( heart trouble, age, ability to get up and down easily) This posture can be set up and a student can stay in this reclining positing from 5-20 minutes. 
I suggest allowing students to sit on a support to get their hips up over their knees. Or use a folded Mexican blanket to allow for elevation in the hips and will help with tightness.


Tuesday, June 25, 2013

Summer Sequence by Janina


building strength & balancing July!

The Intro= Set your intention & clear your mind
Take Mountain pose at the front of your mat- set your feet up, heels under the hips toes slightly turned in, this aligns the outer edges of your feet to parallel position.
Inhaling and exhaling reach your arms out to come up, reaching your shoulders away from the ears. 
The Warm Up= Mountain Pose + Utthita Hasta in Tadasana/Mountain Pose  3- 5 times + Sun Breaths + Right and Left Lunges + Uttanasana + Ardha Uttanasana + Plank +Childs Pose+ A.M.S+ Utkatasana
Start with Mountain Pose moving through Utthita Hasta in Mountain Pose 3-5 times (Taking note of counter actions.)
Add Sun Breath 3 - 5 times (Mountain pose- inhale Utthita Hasta extended up-ward in Mountain Pose, ehale fold forward to a flat back inhale lengthen, echale fold to Uttanasana)
Inahle Ardha Uttanasana, bend the knees and look forward + Exhale Right Lunge, inhale step forward, exhale left lunge  + Uttanansa +  2-5 times 
Add Plank, step or jump through lunge to plank (hold) release knees down gently for Childs Pose, bring the knees slihjtly wider than hip distance, toes to touch, sit back on the heelswalk the sline forward and the arms to a comfortable width (let gravity release the weight of the body on the legs if uncomfortable come out) 3- 5 breaths
Come to Table Top  for core work right hand extends, left leg hold 3-5 breaths 
Switch sides ( this is also preparing the arms and hands for down dog)
take Down Dog- Adho Mukha Savasana (breathe) let the weight move into the heels let the calf muscles release, hips up and back
Inhale lifting Right leg up slightly for Ti-Pod Down dog- with the focus on evenly distributing the weight in the arms)
Switch sides Bend the knees look forward step or jump the feet between the hands.
Take Chair Pose- Utkatasana hold breath exhale straighten to Mountain Pose
Utthita Hasta in Moutain
Exhale Fold to Uttanasana
Inhale take Ardha Uttanasana
Exhale Right leg extends back for Low Lounge- exhale the back heel down, setting up the base,
Inhale hands to the hips weight in the front heel, knee in line with the second and third toe- take
The Vinyasa standing sequence= Warrior 1 + Utthita Parsvotonasana + Warrior 2
Directions:
Warrior 1 on the right side, push the back heel straight. Inhale the arms up and gently gaze through the finger tips.
Exhale the left hand to the left hip right fore arm to the right knee- inhale exhale the left hand up and over the head
Utthita Parsvotonasana intense or extended side stretch
Warrior 2- reach the right arm forward and the left arm back, bring the torso head and neck up, gaze over the right middle finger, keep the weight in the heels and the big toe, don't lose the base.
Breath exhale to "pin- wheel" the hands the the block or the floor inside the front leg!  Switch sides
step the back foot forward foot back and come to table top pose for inhaling cat exhaling cow.
Right foot forward for twists, switch sides

Seated Vinyasana= Dandasana, Gomukasana, Baddha Konasana, Marichiyasana
Coming to a seated position bring the legs out in front of you, fold a blanket or mat to give your self 3-4 inches of a pad to sit on if this causes discomfort. This pose is Dandanasa.
lift the chest activate the abdominals, navel to spine. inhale bend the kness bring the right heel under the left leg and then the left foot over the right knee. follow with the arms*. release the bind in the arms and the legs. switch sides! Bring the feet together and the knees apart, interlock the hands bring them under the feet pushing the feet into the hands hands into the feet lift the chest and drop the chin slightly for BADDHA KONASANA. Release bring the legs in front flex the feet right foot over the left leg, inhale and twist to the right. Switch sides.

Prone Sequence =  Bridge Pose + baddha Konasana  +Supta Pada Gustasana + Savasana
Come onto your back, inhaling and exhaling the hips up- keeping the weight in the arms and feet for Bridge pose, release one vertebrae at a time take Supta Baddha Konasana bring your feet together release the knees to open the groins.  Repeat 2-5 times.
Supta Pada Gustasana
Bend the knees bring the right knee into the chest and take yoga toe lock or grab the outer edge of the foot, straighten the let and the left leg inhale exhale the right leg out and over to the right, let go. In hale exhale extensively
Inhale the leg back up switch the hold to the left hand and inhale and exhale the leg to the left. Switch sides.


Tuesday, May 21, 2013

Yoga & Your Knees

            Yoga is great for building even leg strength v.s uneven leg strength, which is what you get when you  constantly do the same excersise strengthening the same muscle groups. Evenly building leg muscles keeps joints healthy and properly alignes them for stability. To acgieve this Yoga is the perfect task to gaurd against injury and disease or regain strength and flexability after and injury. 

         According to Sandy Blaine, a preventive health consultant, health and wellness writer, and expert yoga instructor, " Yoga is fantastic for the knees especially for people recovering from damaged ligaments.
         Rolfer and Yoga Instructor Michael Salveson explains "Yoga postures strengthen the inner and outer thigh muscles, so they exert an equal pull on the ligaments. This increases the stabilizing action of the leg's big muscles and keeps the kneecap in alignment", notes Salveson in "Yoga Journal." 
Consult a certified Yoga teacher before expairamenting with postures for the knees.

          Julie Gudmestad explains in her Yoga Journal artical "On Your Knees"
"Yoga can either strengthen your knees or blow them out. It all depends on your alignment."
"Yoga poses practiced with conscious good alignment of the leg bones and joints can be a wonderful 
tool for building strong, healthy knees." "Standing poses done with improper alignment can put great 
strain on the knee. The best indicators of knee alignment in standing poses are the relative positions of 
the foot and kneecap. The foot acts like a pointer showing the rotation of the shin and lower leg, while the kneecap shows the rotation of the femur."  Hip joint flexibility can add to the embetterment of the knee joint, the more rotation available to you in your hip sockets the less the knee has to work to find alignment. The hip socket instedcan absorde more. For example: From laying on your back: "Hold your hands behind the left knee and gently pull the legs toward the chest. You should feel a stretch in the back of the right hip, not at the knee. Because the muscles and fascia (connective tissue) of the hip joints are so strong, it may take months of work to improve hip flexibility enough to do Padmasana without knee strain."


She also Advises:
"All these cautions may sound alarming, but you really only need to keep a few simple principles in mind: Always check your alignment, and if you ever feel strain in your knees, back out of the pose and experiment until you feel the stretch in your hips or groins instead. Practiced with care, asanas can contribute to the long-term health of your knees by strengthening your quadriceps, opening your stiff hips, and teaching your body improved alignment and movement patterns that transfer into your everyday activities."
7 Ways to Protect Your Knees in Yoga  From  Catherine Guthrie "Knee Deep in Yoga"

1. Avoid Hyperextending: When joints are overly mobile and flex too far back, they're hyperextended. In the knees, hyperextension often occurs in poses in which the legs are straightened, such as Trikonasana (Triangle Pose) and Paschimottanasana (Seated Forward Bend), putting an unhealthy tension on the ligaments. If you're prone to hyperextension, keep a slight bend in the knees during standing poses and keep your weight evenly distributed among the four corners of your feet. In seated forward bends, place a rolled-up sticky mat or towel under the knee of the extended leg or legs.
2. Start With Your Feet: Proper alignment through the feet is the key to building strength evenly in the ligaments on both sides of the knee; when all the ligaments are equally strong, the kneecap glides effortlessly up and down and the cartilage doesn't get worn down. Separate your toes and press actively through the four corners of your feet in every pose, even inversions. If your feet are out of alignment, your knees are going to suffer.
3. Keep Your Knees in Line: When moving into deep knee bends, such as Virabhadrasana II(Warrior Pose II) and Parsvakonasana (Side Angle Pose), first align your bent knee over your ankle, then draw your kneecap in line with your second toe. Maintain awareness in your back foot, pressing down evenly, while lifting up from the arch of your front foot. "If you let the arch drop, the knee falls inside the big toe, and you're set up to suffer a number of different kinds of overuse and acute knee injuries," says Angela Smith, a professor of orthopedic surgery.
4. Tune in to Subtle Signals: "Oftentimes, the knees don't give immediate feedback," explains Iyengar teacher Joni Yecalsik. "Only later do you realize you've gone too far. When it comes to the knees, the sensation that would normally proceed the red flag is the red flag." If you feel achiness when you come out of a bent-knee pose, you may have worked too hard.
5. Build Strength by Balancing: Balancing poses, especially those that require moving through a bent standing leg, such as Garudasana (Eagle Pose), are especially beneficial. "Very dynamic balancing protects the knee against future injury by training the functional alignment, not just working the muscle," Smith says.
6. Be Prop-Friendly: When it comes to seated asanas, nothing makes a tight knee happier than a bounty of props. In Virasana (Hero Pose), try raising your seat with blankets or a block. Anytime the knees are deeply bent, such as in Balasana (Child's Pose) or Marichyasana III (Pose Dedicated to the Sage Marichi III), pressure can be relieved by placing a rolled-up washcloth as far into the knee pit as possible before bending the joint.
7. Warm Up With Hip Openers: "If your big joints aren't open, your small joints will always take the stress," yoga instructor Sandy Blaine says. "Many people hurt their knees doing Lotus when their hips aren't ready." She recommends warming up with hip stretches like Baddha Konasana(Bound Angle Pose) and Gomukhasana (Cow Face Pose).


Read more: http://www.livestrong.com/article/388510-yoga-postures-to-help-bad-knees/#ixzz2TvuDsxCk

Catherine Guthrie Knee Deep in Yoga
http://www.yogajournal.com/health/1161?page=2

Julie Gudmestad On Your Knees 
http://www.yogajournal.com/practice/526

Saturday, March 30, 2013

Doing Yoga on Your Back

 Supine Yoga Poses are a great way to do Yoga that is gentle on the legs, removing the weight of the upper body and torso and lets you focus on alignment and strengthening from the core. These movements work the body gently and allow the breath to power the movement from the core helping to establish a strong and balanced body for further Yoga poses to be added in! While coming onto the floor remember that it is already a very big movement to come from a standing position to a supine, so move gently using the body to properly distribute weight and move from the muscle belly, not the joints! Get any props, blankets folded, blocks, and a folding chair. ( For an optional Vrksasana- Tree Pose, Warrior 1 Variation on Chair or a Savasana with feet on the chair.) Come down to the floor from a standing pose either gently hinging at the hips and bending at the knees, with control, distributing the weight to the heels, as to NOT COLLAPSE. Use the block under the palms and bring yourself to the floor, SLOW WITH CONTROL.

These are the poses we will work with:
Supine Tadasana (Mountain Pose) and variations
Setu Banda (Bridge) 
Ananda Balasana (Happy Baby Pose)
Pelvic Tilts, 4- 6 total
Supta Baddha Konasana (Bound Angle Pose) with props
Apanasana (Wind Pose) 
Roll to Navasana
Navasana, (Boat Pose) hold for 6 breaths
Reverse Table top, hold for 6 breaths
Paschimottanasana, (Deep Forward Fold), Hold for 6 breaths
Combine and mix them up to spend anywhere from 10-20 minutes on the mat!

From www.davidiyengaryoga.it
Take a Supine Mountain Pose. And initiate Supine Sun Breaths A & B & C This pose will be exactly the same as the Standing Mountain pose gently flex the feet towards the knees (activating the legs), hips and shoulders parallel to the front of the mat chin slightly dropping to chest. Arm to a 45 degree angle away from the hips palms spread and facing up to the ceiling,
REMEMBER: Let the breath move freely through the body to all the areas that feel sore or tight. Use the bolster or a rolled up blanket behind the knees to help them relax and to relive tension from the weight of the legs.
ADJUSTMENT: Take the left hand and reach to the right armpit just to the back ribs and holding the flesh pull the shoulder blade down lifting the right chest slightly. Do the left side using the right hand. Supta Tadasana A: From this adjustment initiate with and inhale the arms palms face each other and disengage from the floor up and exhale them over the head letting gravity take them top the floor. Breath and let the body lengthen from heels to fingertips. Breath and on a inhale take your time and using the core release the fingertips and bring the arms perpendicular to the floor and exhale them to the floor.
Supta Tadasana B: This can be done inhale to the sides up and over the head. Remember to use the natural rotation of the shoulder: inhale palms face up and arms and fingertips reach out and up parallel to the floor exhale continue to raise the hands out and up over the head palms face each other. Supta Tadasana C: Let the arms drag along the floor and come from the hips at a 45 degree angle to the extended upward position. Breathing and initiating the movement from the core.

TRY: Bending the Knees, & bringing the feet to a level position with the knees to hold or and use the abdominals to straighten the feet up and lower the feet down 2- 6 times and then take a twist on the right and left sides. As you need to!

Bridge: Lower the feet to the fleer with bent knees walk the heels back to touch the fingertips arms along the sides of the torso palms flat against floor inhale push the arms from fingertips to shoulders back to the floor lift the chest up. Push the feet to the floor lifting the hips and flesh of the buttock off the floor engaging the abdominals hold, let the breath move, on an exhalation release and let the spine come down slow with control one vertebra at a time.

Pelvic Tilts: In the Bridge Pose with the back completely on the floor, the natural curve of the low back is naturally curving, inhale hips up lifting the flesh of the buttock and low back and releasing downwards to place the tail bone down and straighten out the low back curve. 2-6 times breathing and lifting exhaling and straightening as slow or fast as you like depending on your body!

Supta Baddha Konasana: With as Many Props as you need, let a certified teacher show you how to use!


Ananda Balasana (Happy Baby Pose) Type of pose: Supine Benefits: Releases the low back, stretches the hamstrings Instructions: 1. Come to lie on the back. 2. Bend the knees into the chest. 3. Open the knees, bringing them towards the armpits. 4. Stack each ankle directly over the knee, so that the shins are perpendicular to the floor. 5. Flex the feet. 6. Hold the outer edges of the feet at you draw the knees towards the floor.


Apanasana: Apana Pose, Wind Release Pose, 2-6 times Inhale: Exhale: Let the body come to a natural breath, then Use the weight of the legs, Rock back and forth tail bone to shoulder blades, 3- 4 times if possible balance on the rock forward and come to ½ nivasana. Hold and breathe Release your hands and your feet, push palms and feet lift the hips to


Exhale


Navasana (1/2 Boat): roll, use your legs to get a nice long roll from shoulder blades to tail bone working and let the breath move you too. inhale rock back to shoulder blades exhale roll up to the tail bone, hold in 1/2 boat.
 Reverse Table Top: With your feet and palms flat on the floor and the arms straight, hips on the ground, inhale lifting the hips up letting the head gently come back.


Reverse Table top:  Release your hands and your feet, push palms and feet lift the hips to as flat a back as possible while continuing to breath and hold for a few breaths, releasing slow with control. Repeat as you like!


Paschimottanasana: Sit down on the floor or folded blanket knees bent inhale exhale reach for the feet letting the body naturally come down to the thighs and the forehead resting on the knees (Keeping them bent is a healthy modification for weak knees) stay for 6 breaths and come out straighten the crown of the head to the ceiling for another or however many or few you like!


Take a SAVASANA with shins and feet resting on the seat of a chair, or legs up the wall or use as many props as you like to lay in SAVASANA for 10-12 minutes

Monday, January 7, 2013

Strengthening & Twisting: Ardha Chandrasana & Parivrtta Ardha Chandrasana


             Strengthening and twisting are very important to a dynamic yoga practice. One will use "prep posing" to adjust and move "Helper Muscles" these will be extremely helpful in creating a strong and flexible body that can withstand the kind of physical and mental balance needed to fully express an asymmetrical pose like both Ardha Chandrasana & Parivrtta Ardha Chandrasana.
                  Ardha Chandrasana (Half Moon Pose) is a great pose for building strength, balance and rotation in the hip sockets.
It's challenging pose partner Parivrtta Ardha Chandrasana (Revolved Half Moon Pose) also creates hip mobility while strengthening and twisting the chest, torso & legs. Each pose can be modified using simple adjustments and can be worked on daily to enhance alignment in the body.
                After sun salutes or seated poses where one has stretched their legs and one can take fully Tri Konasana (Triangle Pose), One can move into either posture.


Preparation for Ardha Chandrasana
B.K.S. Iyengar from "Light on Yoga"
From Tri Konasana, bend your front knee keeping the weight in the heels and lifting the standing leg up off the ground, taking the body weight forward onto the standing leg.
Fingertips, or palm for the seasoned practitioner, gently pressing towards the ground, inhale and exhale hold. Make note of any areas of discomfort, make any adjustments and breath.


Pushing greatly through the front heel for the front leg straighten the front leg strongly reaching the heel to the floor lifting rhe back leg and coming into Ardha Chandrasana.
Work leg muscles and release the spine in postures like:
Supta Padangusthasana(Reclining Big Toe Pose) Padangusthasana (Big Toe Pose)
Baddha Konasana (Bound Angle Pose)
 Matsyendrasana (Fish Pose)
Ardha Matsyendrasana (Half King of the Fish Pose) Matsyendrasana 2 (King of the Fish Pose 2)
Janu Sirsana (Head-to-Knee Forward Bend)
Paschimottanasana (Seated Forward Bend)
Padmasana, (Lotus Pose & Prep Pose)
Trikonasana (Triangle Pose),
Parivrtta Tri Konasana (Revolved Triangle Pose)


For Beginners!

Tadasana - Mountain Pose

Firstly start your practice in Tadasana (Mountain Pose), holding for 2- 12 breaths or moving through the pose to other related postures in the Tadasana Family.

Since this is a basic posture the body will feel balanced and at easy, this is ideally how you should feel fully expressed in the following poses; balanced and at ease! 

To do Tadasana- Mountain Pose:

Toes are spread ball and heel of feet reaching into the floor, while the arches are lifted, so there is no dropping in the ankles.

Leg muscles engaged  and lifted, tops of the thighs moving back slightly as to put the weight in the heels- counter acted by the tail bone dropping slightly. Leg Muscles are holding the bones of the legs up and the hips are neutral not spilling forward or back, abdominals are engaged.

Hands are usually fingers spread with palm facing forward, as if should you bring your pinky fingers to the hem of your pants they should divide the body evenly in two. Arms reaching downwards, straight and away from the body as to scoop out the arm pits, not allowing them to touch the outer ribs. The back of the neck is long, crown of the head reaching straight up. Through the entire body from feet to head there is an energy channel that we are experiencing, and through a gentle but effective inhale and exhale and through holding this pose for any amount of time from 2- unlimited breaths the body becomes at easy and balanced- so to say.


Sunday, August 26, 2012

Prama-Ayama Yoga Breathing

                   Prana Ayama-  is the fourth limb of Yoga. It is a way to use the breath to enhance and strengthen ones prana, or "life force". This type of Yoga Breathing is one of the complementary practices involved in practicing Yoga it increases vitality of the practitioner and is a simple exercise that almost anyone can do.
                  The exercises are a form of purification of the body and mind.
In Light on Pranayama by B.K.S.Iyengar it is described as bringing the practitioner "stability, concentration and mental poise."
                  It can be a very simple technique for students or a very advanced exercise for the advanced student and can be used throughout ones life at all stages to be a healthy practice.

                 As one of the main disciplines in traditional Yoga there are many ways to experience the conscious effort to breath known as Pranayama. Here is a basic exercise to draw the mind towards the breath.  By observing the complete sustained inhalation and  exhalation of the breath completely, without judgment to any limitations or goals the practitioner will benefit from a regular breathing practice.

                Prana-yama is best in a seated position or can be very effective laying down. This can be difficult for some people and all people should work with a certified professional to see which position works best.

This allows the body to recharge itself and maintain
regular function of the muscles, nerves, circulation and
emotions.
A healthy breathing regiment will allow the body to be in
optimum health regardless of age and past medical history.

Everyone can benefit from Prana-ayama, by
practicing a healthy and happy breathing weekly, or daily
regiment depending on your interest you can stop and
observe the breath one to two times daily.

Depending of your interest and ability one can decide
to increase the observation each time, weekly or when you
feel that the body is ready. Remember no one knows your
body at well as you do!

- Start by coming to a comfortable seated
position, cross legged in easy pose or sitting in a chair.

- Consciously observe the breathing for
one minute. Then relaxing and noticing any
areas of tension.

                 - Readjusting the posture, realigning the seat &
                     torso comfortably and gently.
                             
                                  And  begin again.


Breathing is important because:
-It is the means the body receives
the essential nutrient Oxygen.
- It is an important way the body
gets rid of waist products and toxins.

Oxygen is important because:
- It is the most vital nutrient in our bodies; it circulates
the blood stream and cleanses the body.
- It is the essential nutrient for proper brain, nerve,
gland and other organs to function.

Without the proper function of the breath the
body becomes week, it experiences reduced vitality,
concentration, and increased susceptibility of disease.

 
This woman is sitting with her hands gently resting on her hips.
 
Practice:
Try practicing Prana-yama in this position or one given by your instructor in
class.

Janina Fisher 2012


Friday, June 29, 2012

Hand Stand Adho Muka Vrksasana

Inversions are a great part of a Yoga program, they relieve leg fatigue, strengthen the shoulder girdle and align and tone everything in between. They are challenging for everyone, so beginners should many chose to practice with an instructor first. Hand Stand also known as Adho Mukha Vrksasana ( Handstand) is a very challenging inversion. An inversion is any pose that causes your head to be below your heart.DO NOT DO THIS POSE IF YOU HAVE TROUBLE CATCHING YOUR BREATH, HIGH BLOOD PRESSURE OR ARE MENSTRATING.
Students must first be comfortable in and move freely without complication in Adho Mukha Savasana (Down Ward Dog Pose). This is the Prep pose for a handstand. (Another good prep pose is Baby Puppy.) Finger and palms are open and spread turning slightly out to the outside of the mat (dialing out ward). Elbows turning inward and straight. This stabilizes the arms, as this will be your base it will need to be strong to hold you up and protect your head. Do this facing a wall until you have a firm understanding of how your body relates to the pose.
1.) Face the wall and come into a Adho Mukha Savasana (Downward Facing dog) with your finger tips 2 - 3 inches from the base of the wall ( sometimes more depending on the yogi student). From here students look to see if they can see the edge where the wall meets the floor. 2.)Walk your feet towards your hands until your shoulders are directly over the wrists, straighten your elbows.
3.) Bend one knee hop on that foot and come up, (feet over head) to express the pose.

Once you are comfortable and stable, if you want drop your head and look forward. From here lift vigorously out of your wrists, straighten your elbows and your shoulders. push your heels up to the ceiling, up the wall as far as you can, reach up do not collapse in the low back, to express the pose fully. To RELEASE Bend the knee you came up on and slowly bring your feet back down to the floor. STAY IN CHILD'S POSE OR UTTANASANA- FORWARD BEND BEFORE COMING TO STAND FOR 3-5 breaths!